Product Version: 6.5.x.x
Overview
This Knowledge Base Article explains the detailed procedure for performing custom remediation for applications that require paid patches using Saner CVEM Patch Management. This method allows administrators to upload and deploy custom patch files to mitigate vulnerabilities when patches are not available directly through the console.
Procedure
Step 1: Log in to Saner CVEM
Log in to the Saner CVEM web console
Select PM (Patch Management)
Step 2: Navigate to Missing Patches
Go to the PM dashboard
Click the Missing Patches tab

Uncheck OS to filter only Third-Party patches
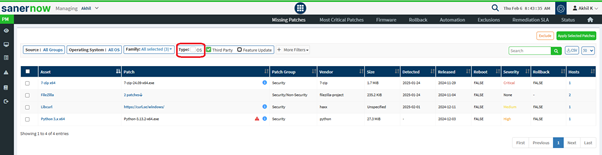
The Asset column displays the application name
The Patch column displays patch details, including vendor source

Step 3: Select Applications for Custom Patching
Identify the required applications from the Third-Party Patches list
Select the applications using the checkbox
Click Apply Selected Patches
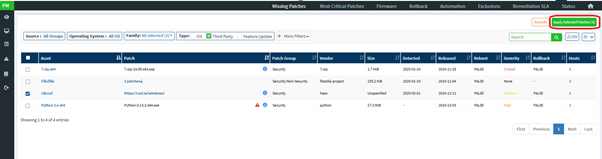
A Create Patching Task window will appear showing the impact details

Step 4: Configure the Patching Task
Provide the mandatory inputs: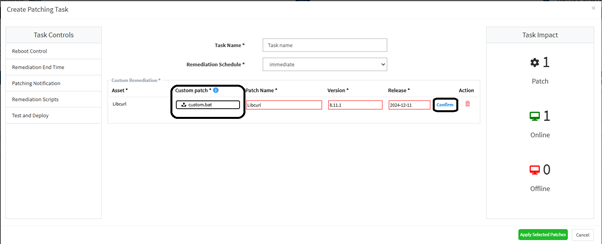
Task Name – Enter a unique name
Remediation Schedule – Select when remediation should occur:
Immediate – Applies patches instantly
After Scheduled Scan – Applies after the next agent scan
Custom Date – Select specific date and time window
Step 5: Upload Custom Patch Files
Upload a Custom Patch file for each selected application.
This file should contain required details so the agent can fetch and install the patch.
Supported File Formats
| Operating System | Supported Formats |
|---|---|
| Windows | inf, reg, ps1, bat, exe, msi, msp |
| Unix/Linux | sh, deb, rpm |
| macOS | sh, pkg, dmg (pkg, app) |
Step 6: Verify Patch Information
Review Patch Name, Version, and Release Date
Modify if needed
Click Confirm next to the Release Date for each patch
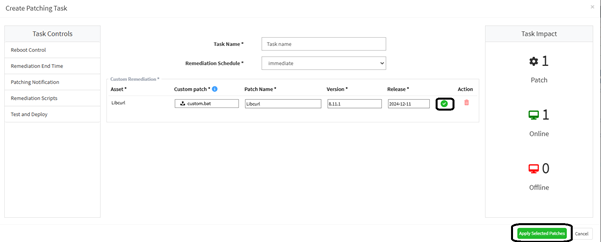
A green tick will appear once confirmed
Step 7: Apply the Selected Patches
Click the Apply Selected Patches button
Saner CVEM will execute remediation as per the configured schedule
Vulnerabilities related to those applications will be mitigated once patches are applied successfully
Conclusion
By following the above steps, administrators can efficiently perform custom remediation in Saner CVEM for applications that require paid patch files. This helps ensure continuous vulnerability mitigation and compliance even when automated patch availability is limited.
For further support or clarification, please contact the Saner CVEM Support Team.
Was this article helpful?
That’s Great!
Thank you for your feedback
Sorry! We couldn't be helpful
Thank you for your feedback
Feedback sent
We appreciate your effort and will try to fix the article